> For the complete documentation index, see [llms.txt](https://docs.tivity.one/llms.txt). Markdown versions of documentation pages are available by appending `.md` to page URLs; this page is available as [Markdown](https://docs.tivity.one/extensibility-and-integration/source-adapter/exchange-adapter.md).
# Exchange Adapter
This adapter represents an Exchange adapter for fetching folder and email fetching.
## Configuration
Exchange configuration defines OAuth parameters.
### Step: Debug
The Debug step requests whether a debug token should be used (instead of authentication).
| Parameter | Type | Format | Required | Remarks |
| ------------------- | ------- | ------ | -------- | ------------------------------------------------- |
| DebugAccessToken | String | | No | The debug access token to use. |
| DebugUseAccessToken | Boolean | | Yes | Determines whether to use the debug access token. |
### Step: OAuth
The OAuth step requests OAuth parameters to use for authentication.
| Parameter | Type | Format | Required | Remarks |
| ---------------------- | ------ | ------ | -------- | ---------------------------------------------------------------------- |
| OAuthApplicationId | String | | No | The ID of the application registered for Exchange. |
| OAuthApplicationSecret | String | | No | The secret of the application registered for Exchange. |
| OAuthCallbackUrl | String | URL | No | The callback URL after OAuth authentication is done. |
| OAuthTenantId | String | | No | The tenet ID of the Exchange or ‘common’ for multi-tenant application. |
## Authentication
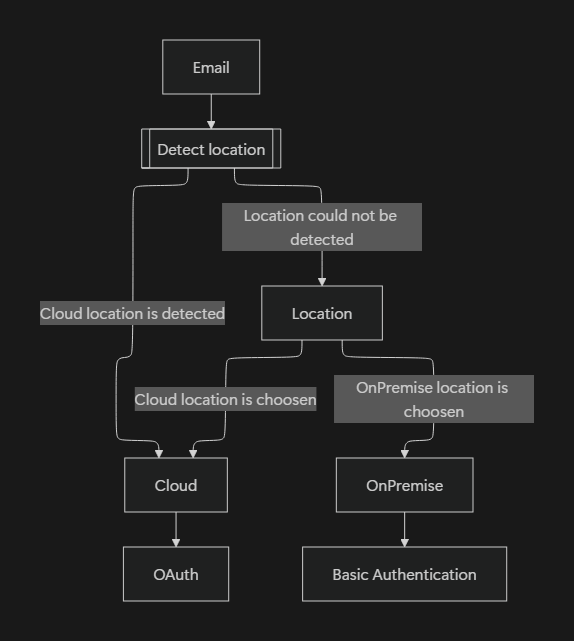
Exchange authentication is either done through OAuth for the cloud location or ‘Basic Authentication’ for on-premise locations.
### Step: Email
The Email step requests the email address to detect the location of the Exchange server.
| Parameter | Type | Format | Required | Remarks |
| ------------------------ | ------ | ------------------------------------- | -------- | ------- |
| EmailAddress | String |
Email address | | |
| ()
| Yes | The email address to authenticate to. | | |
### Step: Location
The Location step requests the location to authenticate to when the location could not be found.
| Parameter | Type | Format | Required | Remarks |
| --------- | ------ | --------------------- | -------- | ------------------------------------ |
| Location | String | “Cloud”, “On Premise” | Yes | The location of the Exchange server. |
### Step: Cloud
The Cloud step requests the URLs of the Exchange server in the cloud.
| Parameter | Type | Format | Required | Remarks |
| --------------- | ------ | ------ | -------- | ------------------------------------------------------------------------------------------------------------------------------------------------------------------------------------------------ |
| AutodiscoverUrl | String | URL | Yes | The auto-discover URL of the Exchange server. Defaults to “[https://outlook.office365.com/autodiscover/autodiscover.svc”](https://outlook.office365.com/autodiscover/autodiscover.svc%E2%80%9D). |
| ServiceUrl | String | URL | Yes | The EWS URL of the Exchange server. Defaults to “[https://outlook.office365.com/EWS/Exchange.asmx”](https://outlook.office365.com/EWS/Exchange.asmx%E2%80%9D). |
{% hint style="info" %}
These values are automatically handled by the adapter.
{% endhint %}
### Step: OAuth
The OAuth step authenticates the user to the Exchange server through OAuth2.
### Step: OnPremise
The OnPremise step requests the version and URLs of the Exchange server on-premise.
| Parameter | Type | Format | Required | Remarks |
| ---------------- | ------ | -------------------------------------------------------------------------------------------------------------------------------------------------- | -------- | -------------------------------------------------------- |
| AutodiscoverUrl | String | URL | Yes | The auto-discover URL of the Exchange server. |
| ServiceUrl | String | URL | Yes | The EWS URL of the Exchange server. |
| OnPremiseVersion | String | "Exchange2016", "Exchange2015", "Exchange2013\_SP1", "Exchange2013", "Exchange2010\_SP2", "Exchange2010\_SP1", "Exchange2010", "Exchange2007\_SP1” | Yes | The Exchange server version (for compatibility reasons). |
### Step: Basic Authentication
The Basic Authentication step requests the username and password to authenticate to the Exchange server.
| Parameter | Type | Format | Required | Remarks |
| --------- | ------ | ------ | -------- | ----------------------------------- |
| Domain | String | | Yes | The domain of the user’s account. |
| Password | String | | Yes | The password of the user’s account. |
| UserName | String | | Yes | The username of the user’s account. |
## Class: Attachment
Represents an attachment of an email message.
| Field | Type | Format | Remarks |
| ---------------- | -------- | ---------------------------- | ----------------------------------------------------------------- |
| ContentId | String | | The content Id of the attachment. |
| ContentLocation | String | | The content location of the attachment. |
| ContentType | String | | The content type of the attachment. |
| EmailId | String | | The ID of the email message. |
| Filesize | Integer | | The size of the attachment. |
| Id | String | \;\ | The ID of the attachment appended by the ID of the email message. |
| IsInline | Boolean | | A value indicating whether this is an inline attachment. |
| LastModifiedTime | DateTime | | The date and time when this attachment was last modified. |
| Name | String | | The name of the file the attachment is linked to. |
## Class: Email
Represents an email message.
### Action: Create
Creates an email in the ‘Drafts’ folder of the mailbox identified by the **MailboxId** parameter or default mailbox if not provided.
| Parameter | Type | Format | Required | Remarks |
| --------------------------------------- | ------- | ------------------------------------------------------------------------------------ | -------- | ------------------------------------------------------------------------------------------------ |
| BccRecipients | String |
Email addresses | | |
| (;)
| No | The list of Bcc recipients for the email message. | | |
| Body | String | | No | The text of the message body. |
| BodyType | String | “Test”, “HTML” | No | The type of the message body's text. Defaults to “HTML”. |
| CcRecipients | String |
Email addresses | | |
| (;)
| No | The list of Cc recipients for the email message. | | |
| FromAddress | String |
Email address | | |
| ()
| No | Used as the "on behalf" sender of the email message. Used in favor of **MailboxId**. | | |
| Importance | String | “Low”, “Normal”, “High” | No | The importance of this email message. Defaults to “Normal”. |
| IsDeliveryReceiptRequested | Boolean | | No | A value indicating whether a read receipt is requested for the email message. Defaults to false. |
| IsReadReceiptRequested | Boolean | | No | A value indicating whether a read receipt is requested for the email message. |
| MailboxId | String |
Email address | | |
| ()
| No | Used as the "on behalf" sender of the email message. | | |
| Sensitivity | String | “Normal”, “Personal”, “Private”, “Confidential” | No | The sensitivity of this email message. |
| Subject | String | | | The subject of the message. |
| ToRecipients | String |
Email addresses | | |
| (;)
| No | The list of To recipients for the email message. | | |
## Logging
| Type | Remarks |
| ----------------------------------------- | ----------------------------------------------- |
| Tivity.App.Plugins.Microsoft.Exchange | The base logging type for the Exchange adapter. |
| Tivity.App.Plugins.Microsoft.Exchange.EWS | Traces EWS communication. |
## Exchange Adapter – Microsoft Entra Configuration
Learn how to configure Microsoft Entra (Azure AD) API permissions and generate an admin consent link for the Exchange Adapter.
This configuration is required for **platform administrators** and **app creators** to enable access to Microsoft Graph for email and calendar functionality.
### Adding Microsoft Graph API Permissions
#### Step 1 — Open the Application
* Go to:\
[`https://portal.azure.com`](https://portal.azure.com/) or [`https://entra.microsoft.com`](https://entra.microsoft.com/)
* Search for **App registrations**.
* Select the application you want to configure.
#### Step 2 — Open API Permissions
* In the left menu, select **API permissions**.
* Click **+ Add a permission**.
#### Step 3 — Select Microsoft Graph
* Choose **Microsoft Graph** as the API.
#### Step 4 — Add Required Permissions
Select **Delegated permissions**, then add the following:
| Permission | Location inside Graph | Description |
| --------------------- | --------------------- | ------------------------------ |
| Calendars.ReadWrite | Calendars | Read/write user calendars |
| Contacts.ReadWrite | Contacts | Read/write user contacts |
| Mail.ReadWrite.Shared | Mail | Read/write shared mailbox mail |
| Mail.Send.Shared | Mail | Send mail from shared mailbox |
| offline\_access | OpenId Connect | Enables refresh tokens |
| User.Read | User | Basic sign-in information |
To add a permission:
1. Use the search bar.
2. Select the permission checkbox.
3. Click **Add permissions**.
> Note: Some permissions such as **offline\_access** and **User.Read** may already be present.
#### Step 5 — Grant Admin Consent (Optional)
If not using an admin consent link:
* Go to **API permissions**.
* Click **Grant admin consent for \**.
### Creating the Admin Consent Link
Administrators can authorize the application using an **admin consent URL**.
#### Admin Consent URL Format
```
https://login.microsoftonline.com/{tenant}/adminconsent?
client_id={clientId}&redirect_uri={redirectUri}&state={state}
```
{% hint style="info" %}
The parameters `redirect_uri` and `state` are optional and not required for a working link.
{% endhint %}
#### **How to build an Admin Consent URL**
**Step 1 — Collect the Required Values**
1. **Tenant**
1. Use `common` if admins from any tenant can authorize the app.
2. Use your tenant ID if you want to restrict it.
Example:\
client\_id={clientId}
1. **Client ID**
1. This is the *Application (client) ID* of the Entra application.
2. Find it under **Overview → Application (client) ID**.
Example:\
client\_id=0534141b-5706-4af0-983a-e15ac31fcacd
**Step 2 — Construct the URL**
Put the pieces together:
```
https://login.microsoftonline.com/common/adminconsent?
client_id=0534141b-5706-4af0-983a-e15ac31fcacd
```
This URL is what you send to administrators.
**Step 3 — Admin Experience**
When an admin opens the link:
1. They see a Microsoft permission review screen.
2. They click **Accept**.
After consent is granted, the application is authorized to access Microsoft Graph based on the configured permissions.